1. Sprites are images and gifs, such as hand pointers, download buttons, etc.
"Add Sprite" option is available in every type of overlay (Break, End screen, Permanent overlay).
Tip: a sprite with a "Resume video" action must be added to the Break so the video can be resumed after the interaction.

2. You can choose sprites from a library or upload your own.

3. You can use one or more sprites in each overlay.
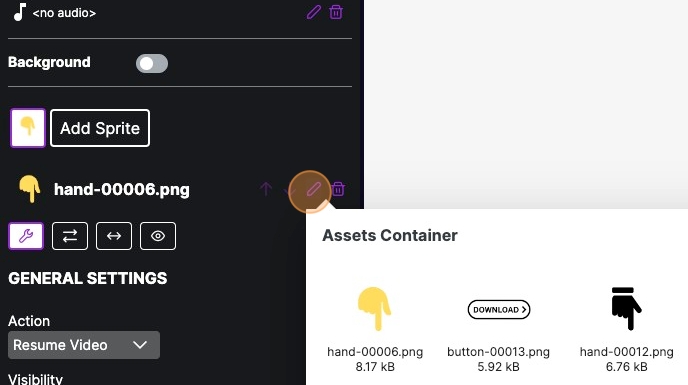
All added sprites are listed on the left side of the "Add Sprite" button.
Select the sprite you want to work with and the settings options (Wrench Pictogram) are displayed below. Keep in mind that those are settings for that particular selected sprite.
In the menu, right from the sprite name you find:
- "ARROWs" - move sprite forward or backwards (to the top or the back layer) if there are more sprites added, e.g. Z order management;
- "PEN" - sprite image change;
- "DUST BIN" - delete the sprite.
4. The GENERAL SETTINGS (Wrench Pictogram) are displayed as default:
Action - you can choose a type of action to be triggered by clicking on the sprite in the playable ad:
- Resume Video - default action in the Break;
- Nothing - default action in the Permanent overlay;
- Open Store URL - default action in the End screen - the Call To Action button.
Visibility - visibility of the sprite:
-
Visible - the sprite is visible in portrait and landscape;
-
On portrait - the sprite is visible only in portrait;
-
On landscape - the sprite is visible only in landscape.
Tip: some sprites looks good in the portrait mode but not in landscape and vice versa. In that case we recommend to set two sprites for each mode separately.
Position - to set the x and y position of the sprite. The values are relative to the video or the screen size regarding "Position Relative To Screen" setting (see below);
Scale - to set the dimension of the sprite with regards to the "Scale Type" setting.
1 is a 100% of the size of:
- the uploaded Sprite or
- the Long Edge of the screen or
- the Short Edge of the screen;
Rotation - to set the Sprite rotation in degrees;
Anchor - to set an reference point with default value 0,5 ; 0,5 e.g. the centre of the sprite. Range goes from 0 to 1;
Transparency between 0 - 1. By default set to no transparency, e.g. 1, full transparency is 0.

5. Position can be easily set by drag and drop a sprite directly in the video screen. The values in the Position section in the left menu (x: , y: ) are updated automatically.

6. Position Relative to Screen - indicates weather the x and y position of the sprite is relative to the screen or the video size.
Note: a setting that defines if the sprite fits to the edges of the video screen or to the device screen. By default this option is OFF, that means the sprite fits into the video screen.
Scale type:
- Relative to Screen Short Edge - The scale of the sprite is calculated from the screen shortest edge (width for the portrait, height for the landscape). For portrait: [[Sprite width = Scale x screen width]]
- Relative to Screen Longest Edge - The scale of the sprite is calculated from the screen longest edge (height for the portrait, width for the landscape). For portrait: [[Sprite height = Scale x screen height]]
- Relative to Sprite - [[Sprite width = Scale.x x image width; Sprite width = Scale.y x image height;]]
Tip: see the impact of the settings after changing the landscape to portrait (a button at the beginning of the video progress bar).

